

How To Get A Tapered Brush In Photoshop
As I mentioned in the introduction to this series of tutorials, all six of Photoshop'due south Brush Dynamics categories share like types of controls so once we've taken a look at how the Shape Dynamics piece of work, which we'll do in a moment, we'll already have a good agreement of how the rest of them piece of work. Unfortunately, controls are not the just thing they share. As we'll come across, the way the controls are laid out makes understanding them a chip more of a claiming than it should exist. Don't worry, though. We'll effigy it out.
To admission the Shape Dynamics options, click directly on the words Shape Dynamics on the left side of the Brushes console. We need to click direct on the words themselves for the controls to announced (clicking inside the checkbox to the left of a category'southward name will plow those options on but won't give usa access to their controls):
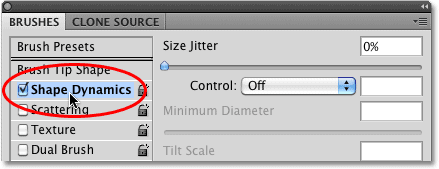
Click directly on the words Shape Dynamics to access the controls.
As soon as you lot click on Shape Dynamics, the controls for the diverse Shape Dynamics options will appear on the right side of the Brushes console. The preview area on the bottom of the panel remains and so we'll exist able to see the consequence we're having on the brush stroke as we make changes:
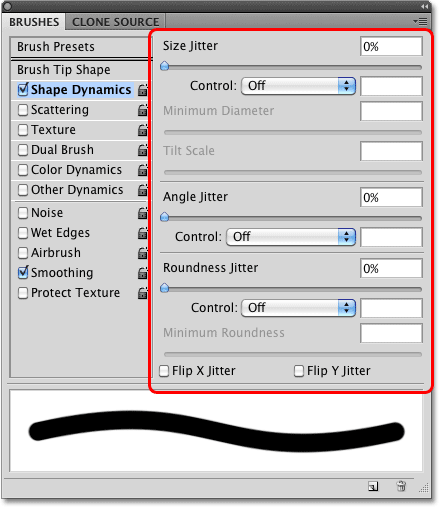
The controls for the Shape Dynamics options appear.
Shape Dynamics allows united states of america to dynamically control the size, angle and roundness of the brush equally we paint with it. In fact, with just these iii controls lonely, we tin can brand our digital, lifeless Photoshop brushes behave as if we were painting with real brushes on newspaper!
I mentioned that the style the controls are laid out makes things more confusing than they should exist, so allow's clear this trouble up correct at present. The Shape Dynamics options are divided into 3 sections - Size, Angle, and Roundness. Unfortunately, this isn't really clear because to the right of each of these headings is the discussion Jitter with a slider bar beneath it. For the moment, ignore the word "Jitter" (and the slider bar). The only thing we're interested in right now is the word that comes before "Jitter". This is the proper noun of the section (Size, Angle, and Roundness):
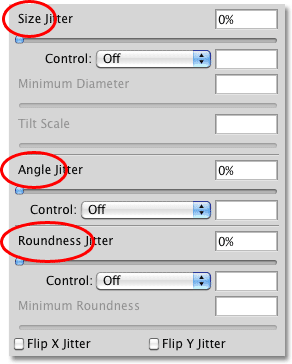
The Shape Dynamics department is divided into 3 sections - Size, Angle and Roundness.
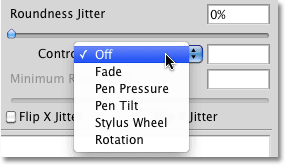
Below each of these three headings is a Control option. Each Command option is tied straight to the heading above it. So, for example, the Command pick at the top should exist labeled Size Control (it isn't, but it should be). The middle one should exist labeled Bending Control (once again, it isn't simply it should be), and the bottom one should be labeled Roundness Control (which of class it is... oh look, no it isn't, but it should be):
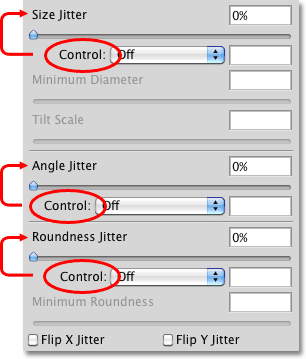
Each of the three Control options is tied to the heading above it.
These Control options give united states of america various means to dynamically control the size, bending and / or roundness of the brush as we pigment. Most of the choices nosotros're given require u.s. to have a pen tablet installed, but there are some choices available if you lot don't accept one (although you're seriously missing out if y'all don't have one). Past default, each 1 is ready to Off, which ways we currently take no control over anything. Permit's gain command by taking a closer await at each section individually.
Size
The Size section gives us dissimilar means to dynamically change the thickness of the brush stroke as nosotros pigment. To encounter a list of all the various means nosotros tin can choose from to command the brush size, only click on the drop-down listing to the right of the Control option. Click on whatever of the options in the list to select it:
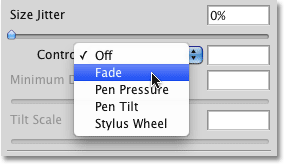
Click on the drib-down list to view all the choices for controlling the size of the brush.
Fade
The Fade selection is the only option we have for dynamically decision-making the thickness of the brush that does not require a pen tablet. In fact, information technology works exactly the same mode whether y'all're using a pen tablet or not. Fade gradually reduces the size of the castor as you drag out a stroke.
If y'all recollect from our Create Your Own Custom Photoshop Brushes tutorial, if we were painting on paper with a existent brush, the castor would lay downwards a continuous coat of paint on the newspaper, but that'due south not how Photoshop works. What Photoshop does is information technology "stamps" a series of castor tips forth the path of your castor as you elevate information technology inside the document. The Fade option gradually makes each new stamp smaller than the previous one until the brush is no longer visible.
Exactly how long it takes for the brush stroke to fade out completely is determined by the number of steps we set for it in the input box to the right of the Control pick. The default number of steps is 25:
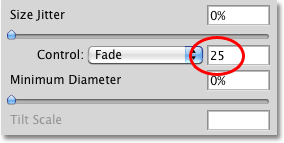
Fade gradually makes the brush smaller in a serial of steps, with 25 steps being the default.
Think of "steps" equally stamps, with each new stamp of the brush tip beingness one step. With the default value of 25, Photoshop will gradually reduce the size of the brush stroke over the course of 25 stamps. The easiest fashion to come across this is past increasing the spacing between each stamp. Allow's exit out of the Shape Dynamics controls for a moment by clicking on the words Brush Tip Shape directly above Shape Dynamics on the left side of the Brushes panel:
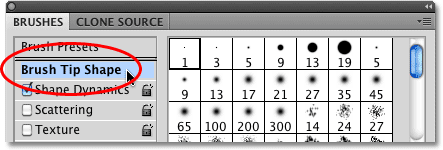
Click directly on the words "Brush Tip Shape".
This gives us options for adjusting the brush tip itself. You'll detect the Spacing option virtually the lesser of the console, only above the castor stroke preview area. The Spacing option allows the states to adjust the altitude betwixt each stamp of the brush tip as we paint a stroke. I'm going to drag the Spacing slider towards the right to increase the corporeality of space between each new brush tip, which will make it like shooting fish in a barrel for u.s. to run across how Fade is working. I even so have i of Photoshop'due south standard circular brushes selected. Discover how each new stamp of the brush tip is smaller than the previous ane. If you count each stamp, you'll find that there's exactly 25 of them from the largest one on the left to the smallest one on the right. After that, the stroke disappears into oblivion:
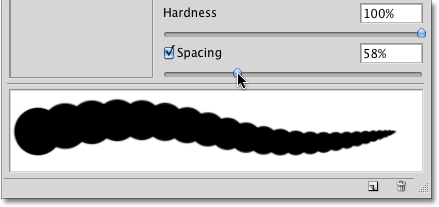
With the Fade option fix to 25 steps, it takes 25 "stamps" of the brush tip to fade out the castor.
I'll click back on the words Shape Dynamics on the left of the Brushes panel and then I can once again access the Size controls and I'll lower the number of Fade steps to 15:
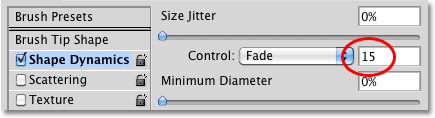
Lowering the number of Fade steps to 15.
If we look at the preview of the brush stroke at the bottom of the panel, we see that the stroke is at present shorter since it's taking only 15 stamps of the brush tip for the size of the brush to fade out to nothing:
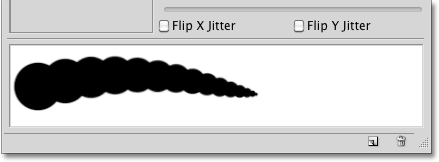
A smaller number of steps the brush size volition fade out faster.
For best results when using Fade to control the size of the brush, you'll usually need to conform the Spacing choice every bit well to fine-melody the length and smoothness of the brush stroke. A smaller Spacing value will give you a smoother looking stroke. Larger values make the individual stamps more than obvious and upshot in a more than ridged appearance.
Minimum Diameter
If yous don't want the castor size to fade out completely, you can employ the Minimum Diameter option to set a limit for how minor the brush can get. Once the brush is reduced to the minimum size, it volition remain at that size for as long as you go on dragging out the stroke. Yous can adjust the Minimum Bore option either by dragging its slider or past entering a specific value into the input box. The default value is 0%, which means the brush will fade out completely. I'm going to increment the minimum bore of my castor to 10% so that once the brush reaches x% of its original size, information technology won't go any smaller:
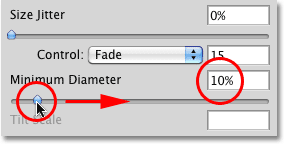
Utilize the Minimum Diameter option to set the smallest possible size for the brush.
If we look at the preview of the brush stroke at the bottom of the panel, we see that the stroke now continues on and never drops below its new minimum size:
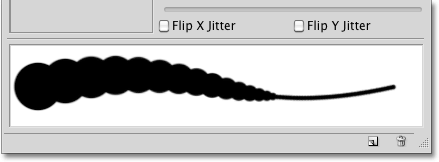
Use the Minimum Diameter option to fix the smallest possible size for the castor.
Pen Force per unit area
By far the most common and natural fashion to dynamically command the thickness of a brush stroke as you paint is with Pen Pressure:
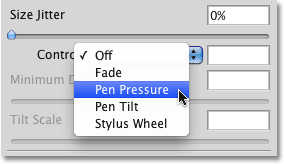
Select Pen Pressure if yous have a pressure level-sensitive pen tablet installed.
With Pen Pressure level selected for the size Command option, the harder you press the pen into the tablet, the larger the stroke thickness becomes. Easing up on the pressure makes the castor stroke thinner. The preview area at the bottom of the Brushes panel will change to show the brush stroke tapered off at both ends when Pen Pressure is selected:
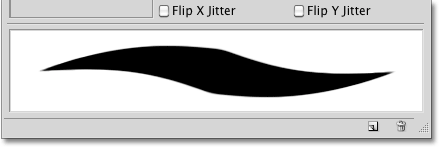
Pen pressure makes controlling the thickness of a brush stroke more than natural.
Of class, you can only use this option if yous have a pressure-sensitive pen tablet installed on your reckoner. Photoshop won't cease y'all from selecting Pen Pressure fifty-fifty if you don't have a pen tablet installed, but it will display a small warning icon to permit yous know that fifty-fifty though yous've selected information technology, it's not going to work:
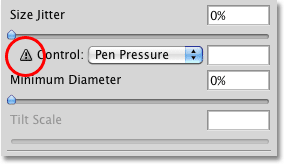
The warning icon is Photoshop's way of maxim "Dainty try, buddy".
Pen Tilt
If you lot do have a pen tablet installed and want even more dynamic command over the size of your castor stroke, try out the Pen Tilt choice:
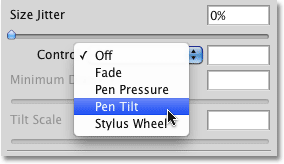
Pen Tilt is another choice specifically for pen tablet users.
Pen Tilt includes all of the force per unit area-sensitive abilities of the Pen Pressure choice and adds the ability to control the size of the brush by tilting the pen every bit yous pigment. The further yous tilt the pen, the larger the stroke becomes. You can control how much of an bear upon tilting the pen has on the castor stroke with the Tilt Calibration pick, which is but available when Pen Tilt is enabled. Drag the slider left or correct to adjust the scaling pct:
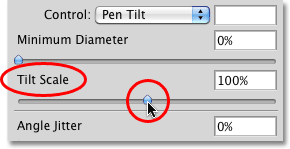
The Tilt Scale option is grayed out and unavailable when Pen Tilt is non selected.
Personally, I find that using Pen Tilt to command the castor size is more frustrating than anything and so I commonly stick with the Pen Pressure option, but that's just me. And by "just me", I mean probably you, as well.
Stylus Wheel
Finally, the final pick we have for dynamically decision-making the castor size is Stylus Wheel:
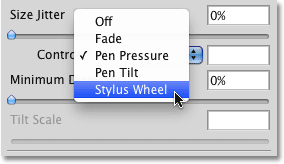
The mysterious and disruptive Stylus Wheel option.
Many Photoshop users select this option thinking information technology volition allow them to control the castor size with their mouse wheel, simply nope, that's not the wheel Adobe is referring to here. This Stylus Wheel option is for people who not simply have a pen tablet but also accept an optional airbrush pen to go with it. The airbrush has a special stylus bike congenital in to information technology, and if you happen to accept an airbrush, you tin use its stylus bike to control your brush size.
At last check, Wacom was selling an airbrush pen for their new Intuos4 tablets for $99.95 (US), but since I oasis't yet had a reason to purchase i, I get the "Nice try, buddy" alert icon when I select the Stylus Wheel choice, telling me I can select it if I want but information technology won't make whatsoever divergence:
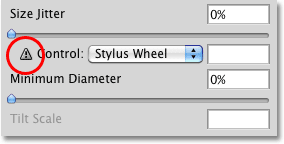
If you accept an airbrush pen, attempt out the Stylus Wheel option. The residuum of us tin just pretend.
Size Jitter
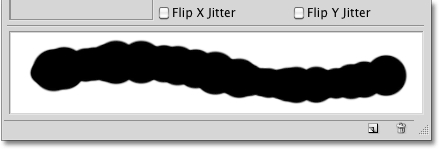
Now that we've looked at the various ways Photoshop gives usa for dynamically controlling the size of a brush as we paint, allow's jump dorsum to that initial option we purposely ignored earlier - Jitter. The term "jitter' is Photoshop-speak for randomness, which is actually the exact opposite of command. Whenever we run across the give-and-take Jitter beside the name of a heading (Size, Angle, Roundness, etc), it ways we can let Photoshop randomly make changes to that attribute of the brush as we pigment with it. Jitter has absolutely nada to do with the Command options we just looked at. Y'all can utilize Jitter all by itself to add nothing just randomness to your brush, or you tin can combine it with any of the Control options for sort of a control/randomness hybrid. For case, you tin can command your brush size with pen pressure and notwithstanding add together some randomness to it besides.
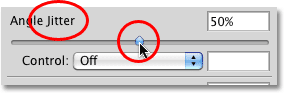
By default, the Jitter option is set to 0%, which means "off". To have the size of the brush randomly change as you paint, elevate the Jitter slider towards the right. The further you elevate the slider, the more than randomness you'll add together:
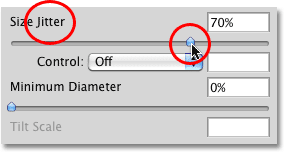
Apply the Jitter slider to randomly modify the thickness of the brush stroke as you paint.
Proceed an eye on the preview area at the bottom of the Brushes console to see the results equally you elevate the Jitter slider. Notice how the brush randomly changes size with each new stamp of the brush tip:
College Jitter values result in more than randomness to the size of each brush tip.
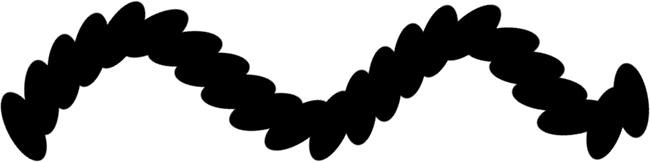
Equally I mentioned, you lot can combine Jitter with any of the Control options for a niggling added excitement. Here's a castor stroke I painted with the size Control option set up to Pen Pressure level and combined with a size Jitter value of 50%:
Combine Control options with randomness for interesting results.
Now that we've taken a detailed expect at what the diverse options are for dynamically controlling the size of a brush and how they all work, let'due south quickly see how we tin utilize many of these same options to control the angle of our brush!
Angle
Photoshop'due south Shape Dynamics allows us to dynamically command the angle of our brush equally we paint in much the same manner that we tin control its size. In fact, about of the choices we're given for decision-making the angle are the aforementioned. Before we keep though, I'thousand going to select a different brush tip from the Brush Tip Shape options in the Brushes console, for the simple reason that I currently take a round castor selected and a circular brush looks, well, round no affair which bending you ready it to. I'll choose the Hard Elliptical 45 pixel brush from the listing:
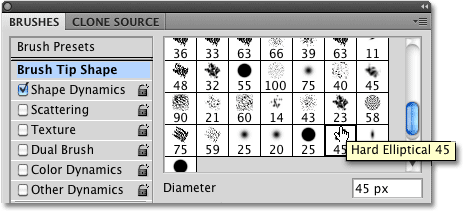
Click on "Brush Tip Shape" in the top left corner of the Brushes console to cull a new castor tip from the list.
With my new castor tip now selected, I'll switch back over to the Shape Dynamics options. Click on the drop-downwards box to the right of the angle Control option to view our choices for controlling the castor angle:
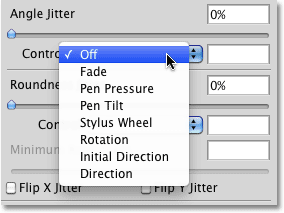
Many of the Brush Dynamics sections share the aforementioned Command options, like Fade, Pen Pressure, etc.
Fade, Pen Pressure, Pen Tilt, Stylus Cycle
As we tin see in the list, Fade, Pen Pressure, Pen Tilt, and Stylus Wheel are all here again, and they all work in a similar way except that this time, they'll control the bending of the brush rather than its size. For example, Fade will rotate the brush 360° over a specified number of steps. The default number of steps is again 25. I'll select Fade and lower the number of steps to xv just as I did with the Size control:
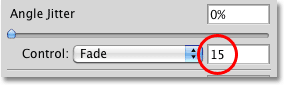
Telling Photoshop to rotate the brush tip over the course of 15 steps with the Fade option.
The preview surface area at the bottom of the Brushes panel updates to testify us the result. The brush now rotates along the path of the stroke, taking exactly 15 stamps of the brush tip before information technology returns to its original angle:
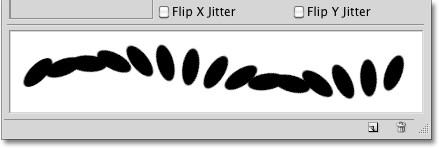
"Fading" the angle of the brush simply means rotating the brush over a certain number of steps.
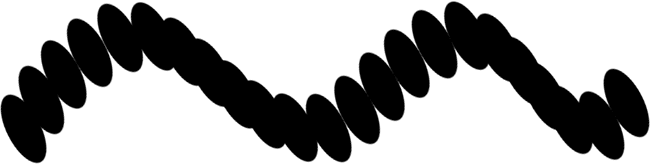
Selecting Pen Pressure allows united states to vary the angle of the brush based on the amount of pressure being applied to the pen tablet. Pen Tilt controls the bending past tilting the pen every bit nosotros pigment. Here'due south an example of a castor stroke I painted with the angle command set to Pen Pressure. I've increased the spacing between the individual brush tips to brand things more obvious:
With Pen Pressure selected, vary the corporeality of pressure applied to the pen tablet to rotate the brush.
Direction and Initial Direction
Of all the choices available to u.s.a. for controlling the castor angle, the one used virtually frequently is Management:
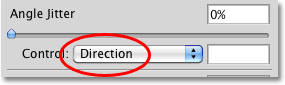
Information technology may be at the bottom of the list, but "Direction" is ordinarily the top pick for decision-making the brush'due south angle.
The Direction selection works exactly the same whether yous're using a pen tablet or a standard mouse. The brush tip automatically rotates to follow the direction y'all're painting in:
The castor now follows the management we paint in for a more than natural look.
You tin also effort the Initial Direction option:

The Initial Direction forces the angle to the initial direction yous paint in.
Initial Direction locks the angle of the castor to the direction yous first drag your mouse or pen in. Regardless of which direction you move in subsequently that, the bending remains unchanged:
With Initial Direction selected, the instant you move your mouse or pen, yous lock in the brush'south bending.
Angle Jitter
Only as we saw with the Size section, the Angle section too includes a Jitter option directly to a higher place the Command pick. We already know that "jitter" means randomness, and in this instance, nosotros tin apply the Jitter slider to tell Photoshop to randomly modify the angle of the brush every bit we paint. The further we elevate the slider towards the right, the more randomness will be applied:
Apply the Jitter slider in the Angle section to randomly change the angle of the brush.
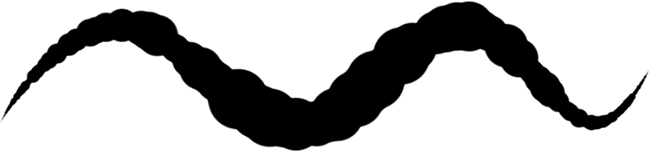
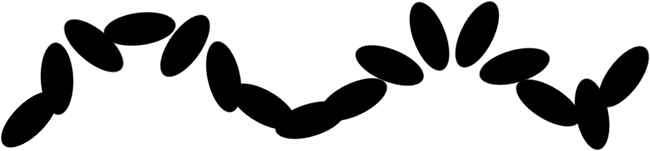
Again, the Jitter slider has nothing to do with the Control option below information technology. We can utilise Jitter past itself to add nothing but randomness to the brush angle, or we can combine Jitter with ane of the Command options for a "best of both worlds" effect. Here's a brush stroke I painted with the Command choice set to Direction combined with a Jitter value of 20%:
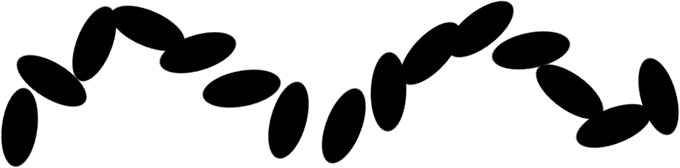
With a Jitter value of 20%, a pocket-size corporeality of randomness has been added to the angle of the castor tip as information technology follows the direction of the stroke.
Roundness
The third aspect of the brush that nosotros tin can dynamically control using options in the Shape Dynamics section is its roundness. Before we go on, I'm going to switch dorsum to 1 of Photoshop's standard round brushes past clicking on its thumbnail in the Brush Tip Shape section of the Brushes panel. I'm doing this merely to brand it easier for u.s. to see the outcome nosotros're having on the castor. You can use whatsoever castor tip you like. Once I've chosen my new castor tip, I'll switch back over to Shape Dynamics:
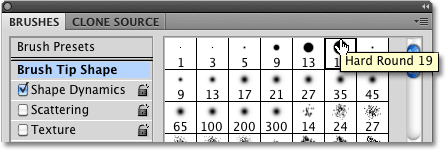
Choosing the Difficult Round 19 pixel brush from the Brush Tip Shape options.
The term "roundness" here can be a bit misleading since it has nothing to practise with whether or not the shape of your brush tip is really round. It may help to retrieve of roundness as "flatness", since what we're really doing is flattening the brush tip equally we paint. A roundness value of 100% merely means that the castor tip looks completely normal, only as it appeared in its thumbnail when you selected it, whether it's an bodily round brush similar the one I've chosen, a leafage brush, snowflake, chalk castor, or whatever the case may be. By choosing a way to dynamically control the roundness, nosotros can squish and flatten the brush tip along the length of the stroke.
Just every bit we've seen with the Size and Angle sections, the Roundness section contains its own Control option, and we simply click on its drop-downwards box to choose a control method from the list. The options for controlling the roundness are pretty much the same every bit what we're given for controlling the brush's size:
The options for decision-making the brush size and roundness are more often than not the aforementioned.
Fade
Choosing Fade in the Control option will tell Photoshop to gradually reduce the roundness of the brush over a specified number of steps. Once more the default number of steps is 25, but I'll reduce it to 10 and I'll increase the spacing between the brush tips then we tin encounter what's happening. The brush starts out with its regular shape and gradually flattens, reaching its minimum roundness value on the last step:

With the roundness control set to Fade in 10 steps, information technology takes 10 stamps of the brush tip to attain minimum roundness.
Choosing Pen Pressure allows united states to control the roundness of the brush based on the pressure beingness applied to the tablet with the pen. Pen Tilt makes information technology possible to adjust the roundness as nosotros paint by tilting the pen. Holding the pen at a normal xc° angle from the tablet will gear up the brush to maximum roundness. Tilting it in any direction will reduce the roundness. Hither, I've set the roundness command to Pen Tilt and painted a simple horizontal brush stroke, tilting the angle of the pen as I connected along the stroke:

With Pen Tilt selected, the angle of the pen determines the roundness of the brush tip as yous paint.
Minimum Roundness
If you don't desire the brush tip to flatten completely, we tin control how flat it tin become using the Minimum Roundness option. The default value is 1%, which means 1% of the brush tip's normal size. I'g going to increase it to 25%:
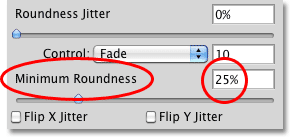
Increment the minimum roundness value if yous want to prevent the brush tip from going completely flat.
I'll set the roundness control dorsum to Fade and lower the number of steps to five. In one case the roundness reaches 25% of its original size, it remains at that level for the residue of the stroke:

In one case the brush reaches 25% roundness, it stays there until yous begin a new stroke.
Roundness Jitter
Lastly, the roundness section includes the same Jitter option we've seen with the Size and Bending sections, and as with those other two sections, Jitter is completely separate from the Control option. Dragging the Jitter slider towards the right will add randomness to the roundness of the brush equally we paint. Use the Jitter choice on its ain or combine it with any of the Control options:
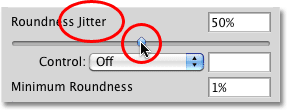
Permit Photoshop randomly change the flatness of the brush equally you paint by increasing the Jitter value.
Where to go next..
And there nosotros have it! Photoshop's Shape Dynamics options in the Brushes panel make it fun and easy to dynamically control the size, angle and roundness of our brushes as we pigment! But that's only the beginning of what nosotros can do with our brushes. Upward next, nosotros'll wait at the Scattering options! Or, jump to any of the other Castor Dynamics categories using the links below:
- Texture
- Dual Brush
- Color Dynamics
- Other Dynamics
Source: https://www.photoshopessentials.com/basics/photoshop-brushes/brush-dynamics/shape-dynamics/
Posted by: jacksonalear1991.blogspot.com
0 Response to "How To Get A Tapered Brush In Photoshop"
Post a Comment